How to Create Cinematic Look in Photos. It’s not really about expensive cameras or complicated gear. People often assume that, but honestly… It’s more about how you notice things. The way light hits a wall, the pause before someone turns their head, the silence in a dim room. Cinematic photography starts there, in observation, not equipment.
Cinematic images, though, come from intention. Even a simple one. A person standing by a window, light hitting half their face… nothing complicated, but it says something.
• Golden Hour Lighting
- Shoot during sunrise or sunset
- Soft, warm, directional light
- Long shadows add drama
Learning how to create a cinematic look in Photos provides the technical foundation needed to evoke mood and atmosphere. As we explore these professional techniques, you will discover how to turn every frame into a compelling piece of art. Let us begin this journey toward creating images that truly move people.
Understanding the Fundamentals of Cinematic Photography
Something in the foreground, maybe slightly blurred. Your subject somewhere in the middle. And then a background that either fades away or adds context. It creates this sense that you could step into the frame if you wanted to.
When you’re actually holding the camera, settings do matter, of course they do. But not in the stiff, textbook way people often explain them.
Consistency is vital when building a visual story. Whether you are shooting a single image or a series, maintaining a unified atmosphere ensures that your message remains clear. This often means prioritizing the overall mood over technical sharpness or perfect clarity.
Some photos lean toward warm tones, giving a nostalgic, almost comforting feel. Others go cooler, creating distance or quiet tension. Then there are muted palettes, where colors are softened, almost faded, like a memory.
| Feature | Traditional Photography | Cinematic Photography |
|---|---|---|
| Primary Goal | Documenting reality | Conveying emotion |
| Subject Focus | Technical sharpness | Atmospheric narrative |
| Approach | Spontaneous capture | Intentional composition |
Mastering Lighting Techniques for a Film-Inspired Aesthetic
Contrast plays a quiet but powerful role. Mastering Lighting Techniques, not just the obvious kind, but the subtle balance between light and dark. Cinematic images rarely show everything clearly. They hide parts of the frame in shadow, letting your eyes fill in the gaps.
Using Gels to Introduce Color Contrast
Not heavy, just enough to break that overly clean digital feel. A slight vignette, too, darkening the edges just a touch, can guide the viewer’s eye without them even realizing it.
• Start with Basic Adjustments
- Contrast: +10 to +30
- Highlights: -30 to -70
- Shadows: +10 to +40
- Whites: slightly reduced
- Blacks: deeper for drama
You should experiment with complementary colors like teal and orange to achieve a classic Hollywood look. These hues naturally draw the eye to the subject while providing a rich, saturated background. Using gels effectively is a hallmark of high-quality film-inspired photography.
Softbox Placement for Moody Portraits
Using the tone curve in editing can help shape this. A gentle curve can deepen shadows while keeping highlights soft. And sometimes lifting the blacks just a little—so they’re not completely crushed—adds that soft, film-like touch.
Consider the following lighting setups to enhance your cinematic photography projects:
| Lighting Setup | Primary Effect | Best Use Case |
|---|---|---|
| Side Softbox | High Contrast | Moody Portraits |
| Backlit Gels | Color Depth | Dramatic Scenes |
| Butterfly Light | Glamour Focus | Fashion Photography |
But it’s not just about cropping randomly. You have to rethink the composition within that wider frame. Where does the subject sit? Sometimes it works beautifully. Other times, what fills the extra space.
Composition Strategies to Enhance Visual Narrative
The environment plays its part too. Actually, more than its part. Weather, for example, can completely transform a scene. Rain adds reflections, doubles your light sources, and creates a mood instantly.
• Tone Curve Adjustments
- Slightly lift blacks (fade effect)
- Add a gentle S-curve for contrast

Utilizing negative space is a powerful way to make your images feel expansive and immersive. When you leave room around your subject, you allow the environment to play a larger role in the story. Darken edges slightly. This approach is a hallmark of film-inspired photography, as it mimics the way directors frame scenes to emphasize scale and isolation.
Why 2.35:1 and 16:9 Ratios Evoke Film
Even if the answer is simple. Someone waiting. Someone thinking. Someone leaving. That small idea changes how you shoot. It changes your timing, your angle, your choices.
Start simple. Adjust exposure, correct the white balance. Then move into contrast and color. Slowly, carefully.
| Aspect Ratio | Common Use | Visual Impact |
|---|---|---|
| 16:9 | Digital Displays | Standard, immersive, balanced |
| 2.35:1 | Draws attention to the subject | Expansive, dramatic, cinematic |
| 4:3 | Vintage Media | Nostalgic, intimate, square |
How to Create a Cinematic Look in Photos Through Color Grading
And yeah, sometimes it won’t work. You’ll take a shot that looked amazing in your head, and when you check it… it’s just not there. That happens more often than people admit.
Cool Shadows and Warm Highlights
One of the most effective techniques for adding depth is split-toning. By introducing cool blue or teal tones into the shadows, you create a sense of mystery and separation from the subject. Simultaneously, adding warm yellow or orange tones to the highlights mimics the natural glow of sunlight or tungsten lighting.
A subtle vignette can draw attention inward, but again, keep it light. Heavy effects can make the image feel forced.
Desaturating Specific Colors for a Muted Look
And then there’s flat lighting, probably the biggest issue. If your light has no direction, no shadow, no variation… it flattens everything.
Over time, something interesting happens. Creates that soft film look. You stop thinking about all these individual elements so much. You start seeing scenes as a whole.
| Mood | Shadow Tone | Highlight Tone | Saturation Level |
|---|---|---|---|
| Vintage Film | Deep Teal | Soft Amber | Low |
| Dramatic Noir | Cool Blue | Neutral White | Very Low |
| Golden Hour | Dark Purple | Warm Gold | Moderate |
Essential Camera Settings for Cinematic Depth
And you develop your own style without really trying. Composition Techniques That Feel Cinematic. This part is often ignored—but it’s huge. Maybe your photos lean darker, more moody. Or maybe they feel soft and warm. There’s no right direction.
• Saturation vs Vibrance
- Lower saturation slightly (-5 to -20)
- Increase vibrance a bit (+5 to +15)

To achieve a film-like quality, you must carefully balance your aperture and shutter speed. A wide aperture, such as f/1.8 or f/2.8, is essential for creating a shallow depth of field. Feels more natural and story-driven. This separation between your subject and the background mimics the look of high-end cinema lenses, drawing the viewer’s eye exactly where you want it.
Consistency matters, though. When your images share a similar feel, place your subject off-center, and they become recognizable. People start to notice that it’s your work.
The following table outlines how specific settings contribute to a cinematic aesthetic:
| Setting | Cinematic Goal | Recommended Range |
|---|---|---|
| Aperture | Depth of Field | f/1.4 – f/2.8 |
| Shutter Speed | Motion Feel | 1/50s – 1/100s |
| ISO | Texture Control | 100 – 800 |
Practice is where everything slowly clicks. The more you shoot, the more you notice. Light becomes something you pay attention to without thinking. You start seeing frames everywhere—in ordinary places, everyday moments.
Post-Processing Workflow for Cinematic Effects
You can transform raw digital files into cinematic masterpieces by mastering specific post-processing workflows. This final stage is where the atmosphere is solidified, Roads, walls, and shadows guiding the eye through texture and light manipulation. Effective photo editing for a cinematic look requires a balance between technical precision and artistic intent.
Adding Film Grain and Texture Overlays
Digital sensors often produce images that appear too clean or clinical for a film-inspired aesthetic. To counter this, you should introduce subtle film grain to mimic the organic imperfections of analog celluloid, adding motion and direction. Texture overlays provide a tactile quality that adds depth and character to your frames.
• Popular Cinematic Color Styles
- Teal & Orange
- Cool shadows (teal)
- Warm skin tones (orange)

When applying these elements, keep the opacity low to maintain a natural appearance. Overdoing the grain can degrade image quality, so always preview Foreground Elements in your work at full resolution. This subtle addition helps bridge the gap between modern digital clarity and the nostalgic warmth of traditional film.
Simulating Lens Flares and Light Leaks
Simulating lens flares and light leaks is a powerful way to add a sense of nostalgia and high-production value to your work. These optical artifacts suggest that the light interacted with the camera lens in a unique, physical way. Learning to create cinematic effects in photos through these advanced editing steps is vital for achieving a professional, polished finish.
| Effect Type | Primary Benefit | Best Usage |
|---|---|---|
| Film Grain | Adds organic texture | Low-light or moody scenes |
| Lens Flares | Simulates high-end optics | Golden hour or backlight |
| Light Leaks | Creates nostalgic mood | Vintage or lifestyle shots |
By carefully layering these effects, you gain full control over the final mood of your image. Always ensure that the direction of your simulated light matches the natural light source in your original photograph. This consistency is the key to making your edits feel authentic and intentional.
Selecting the Right Gear for a Cinematic Aesthetic
Modern digital sensors are incredibly sharp, but they sometimes lack the soul found in older optics. While high-resolution cameras provide immense detail, they can often produce an image that feels too clinical or sterile. To create cinematic effects in photos, many professionals look toward equipment that introduces subtle imperfections.
Choosing the right glass is a fundamental part of developing a unique cinematic style photography signature. Instead of relying solely on software filters, shoot through objects (glass, leaves, frames), you can use the physical properties of your lens to shape the light. This approach ensures that your images have an organic quality that is difficult to replicate through digital editing alone.
• Grain
- Add grain: 10–30 amount
- Keep the size small and the roughness moderate
Vintage lenses are highly prized for their unique, Negative Space rendering and soft contrast. These older pieces of glass often feature coatings that react differently to light, creating depth and layers, resulting in beautiful organic flares and softer transitions. By using these lenses, you can effectively bridge the gap between modern digital clarity and a classic film aesthetic.
When you use vintage glass, you gain access to optical flaws that actually enhance the narrative of your work. These lenses help you create cinematic effects in photos by reducing the harshness of modern sensors. This intentional choice allows for a more nostalgic and emotive look in your cinematic style photography projects.
| Feature | Modern Lenses | Vintage Lenses |
|---|---|---|
| Sharpness | Extremely High | Moderate/Soft |
| Contrast | High/Punchy | Lower/Muted |
| Flare Control | Excellent | Artistic/Organic |
| Character | Clinical | Unique/Dreamy |
Ultimately, the gear you select acts as a creative partner in your process. By understanding how different optical properties influence your output, leaving space around the subject, you can make informed decisions that align with your artistic vision. Investing in the right equipment is a powerful way to elevate your work and achieve a truly professional look.
Final Words: Your Journey to Cinematic Editing Starts Now
Transforming a simple snapshot into a powerful narrative requires a blend of technical precision and creative intuition. Achieving a cinematic look in photos is a holistic process that relies on your ability to control light, composition, and color with intent.
Related Article: AI Video Editing Tools for Face Swap Online
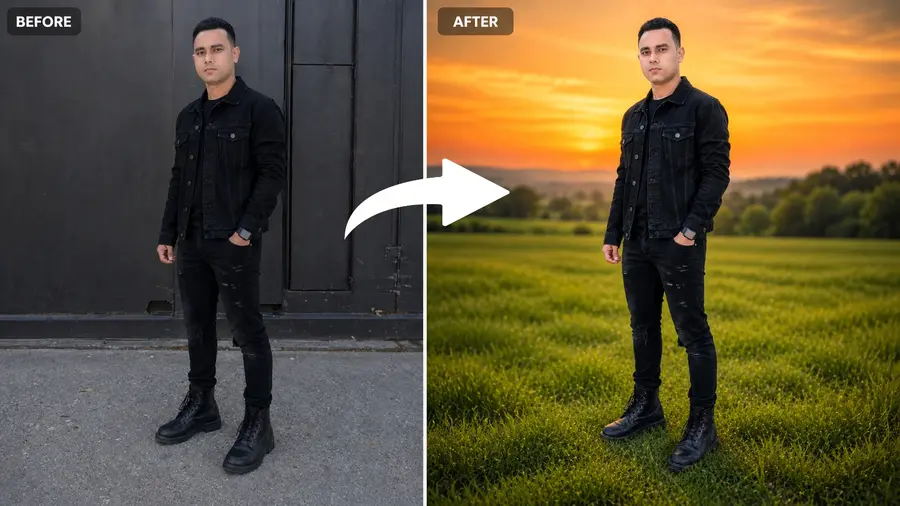
Copy this prompt:
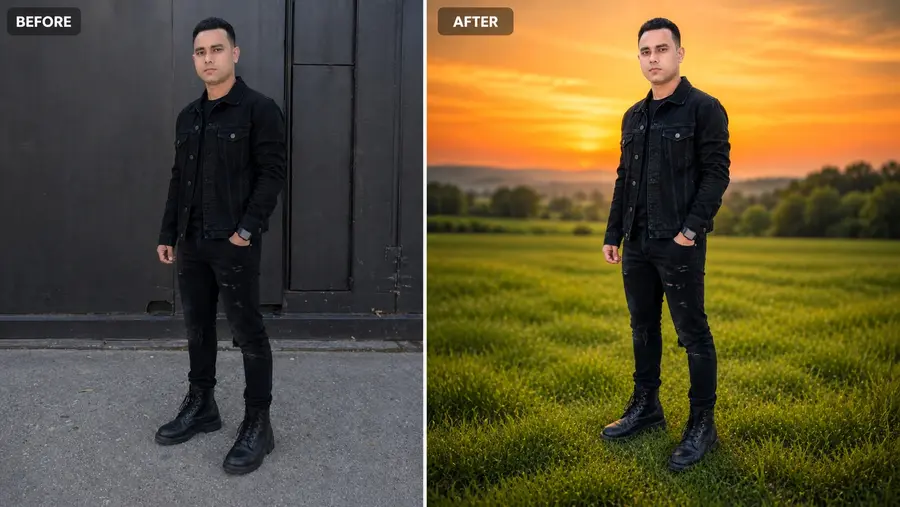
Bright cinematic outdoor color grading. Change the sky to a full vibrant orange sunset gradient covering the entire sky, smooth soft gradient, no visible sun in the sky. Keep the lighting bright natural daylight, not dark and not night style. Increase grass color to 100% vibrant natural green saturation with realistic tones. Add strong background blur (depth of field) to the distant background while keeping the subject extremely sharp. Soft atmospheric haze in the distance. Balanced exposure, natural skin tone, high clarity, professional DSLR look, ultra realistic cinematic photo.
| Upgrade Your Photos |
|---|
| TRY CINEMATIC EFFECTS |
| Make It Cinematic |
You now possess the foundational knowledge that adds emotion and focus to elevate your portfolio. Start by applying these cinematic photo editing tips to your existing raw files. Experiment with contrast ratios and color grading tools found in Adobe Lightroom or Capture One to see how subtle shifts change the mood of your work.
True mastery comes from consistent practice and observation. Study the frames of your favorite films to understand how directors use depth and shadow to guide ISO: 50–200 the viewer. Every image you capture is an opportunity to refine your unique artistic voice.
Share your progress with the photography community to gain fresh perspectives. Your journey toward achieving a cinematic look in photos is ongoing. Keep pushing the boundaries. Don’t over-blur your gear and your imagination to create images that resonate with your audience.
Implement these cinematic photo editing tips today in Lightroom Mobile to see immediate improvements in your visual storytelling. Your next great shot is waiting for you to capture it.